

It's summer, and the kids are out of school.
Now, I don't know about your kids but mine would just sit around and watch cartoons most of the day if they could get away with it. Alas, they have a mean mommy (so they say), who thinks they should do something with their brains besides stare at a screen.
Disclaimer here - I'm not one of those oh-so-perfect Moms who always has oh-so-perfect little crafts, and worksheets and this and that for her kids all the time. For the most part, I leave them to their own imaginations (which isn't always a good thing...), but many days there comes a point when they just can't seem to come up with anything to do on their own (except fight - they're really good at that), and Mommy is left trying to find something for them to do.
We've had quite a few days lately when it's rained all day long, so they don't have a whole lot of time to play outside (I can only take so many clothing changes and muddy feet-tracks through my house before my mommy-brain starts vibrating and steaming, and that's never a good thing), and today was one of those days. We made it most of the day, but after supper they were wired, high voltage, high volume, high speed - just HIGH, mostly, and they NEEDED something to do. Ju decided she wanted to do some kind of an art project, so I randomly decided to try salt-painting.
Now, if you use Pinterest much at all, you've probably seen one of the many salt-painting projects running around. If you haven't, feel free to go search 'salt painting' on Pinterest right now. I'll wait until you get back...
....
....
....
...alrighty, then. Satisfied your curiosity now? No?
Then by all means, keep reading.
The idea of salt painting is basically this:
First, get your supplies -
A bottle of basic white school glue (elmer's, store-brand - we used both),
Paper (we used plain ol' printer paper, but something heavier would be better, if you have it),
Salt (the regular table variety)
Eyedroppers, medicine droppers, paintbrushes - whatever suits your fancy (more on that later)
Water
Food Coloring

I put about 1 tablespoon of water in each of those dandy little containers
(you can get them for about $2 each at Walmart - just buy a can of Great Value brand cinnamon rolls, open them up, and there's a handy-dandy little white plastic container in there with icing in it. Just dump the icing out, wash the container, and you're ready to go. Of course, if you don't want to be wasteful, you can eat the cinnamon rolls and all that... or you can just use whatever you have.), then I added about 3 drops of food coloring to each one. Swirl it around carefully, or stir it with a toothpick or something.
Ok. Now that you've got all that done, take the glue and draw a picture on the paper with it. (Alternatively, you can draw a picture with a pencil and trace it with the glue - whatever floats your boat. We did both.)

Once you have your picture done to your liking, pour salt all over it.

We found it just as easy to just dump the salt on the paper and then tip the paper every which way, sliding the salt all over. You want the glue to be thoroughly coated in salt.
It will look kind of like this when it is done:

Now, take some of the colored water in your dropper (or whatever you're using), and drop a bit on the salt/glue. The fun part is that it slowly begins to creep down the line from wherever you drop it.
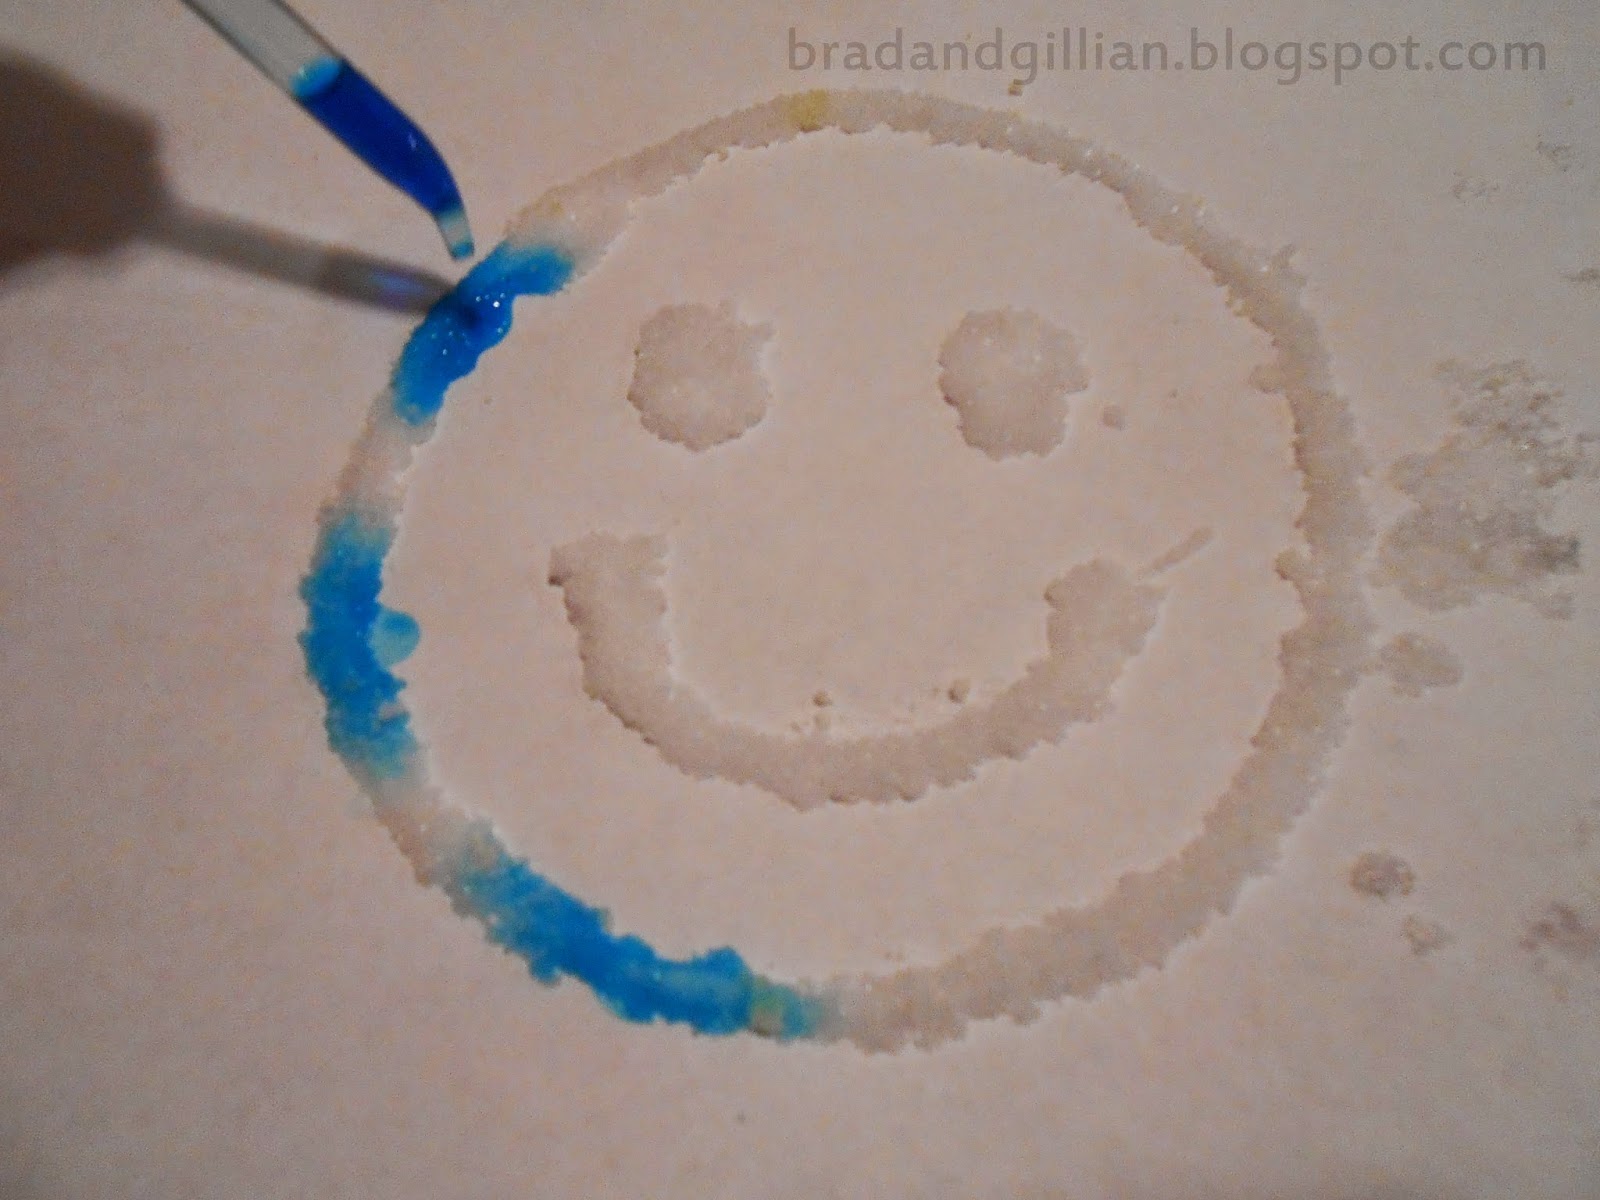
Add more colors and watch them mix together and make new colors...

And you have a pretty little painting.
In theory, right?
And it's all very neat, not terribly messy, etc.
Right?
Well, yeah, if you're a steady-handed, mostly sane Mommy. (Which I'm not, particularly)
Not so much if you're a not-so-steady-handed, somewhat rambunctious, four-year-old.
A little better for a somewhat-of-a-perfectionist, artistically-inclined seven-year-old.
But fun for both.
The seven-year-old was pretty careful with it and enjoyed dropping the colors on just so, and making a pretty pictures; here's some of her work:

She kept hers fairly well to thin lines of glue, and as much salt would stick to it, and it it colored nicely. Watching the dye creep down the salt lines is pretty cool, and for the kids, it's neat for them to see how the colors mix and make new colors.
The four-year-old...well, he though it was awesome to thoroughly saturate everything with glue...and salt...and dye. Here's some of his work:

(We all have talents...drawing dinosaurs isn't one of mine - but hey, they made him happy!! :) Oh, and the top right blue/green/yellow one is hers, not his.)
Yes, He likes green. what was your first clue? He pretty well tried to empty the whole container of green on his own.
The all-green dinosaur on the left, he spread glue pretty heavily over the whole thing and then dumped large quantities of salt over it. The salt was pretty wet, though, from the glue, and didn't take the dye as dramatically. Which, of course, didn't bother him - he just poured on lots of it...I had to pour some of it off, and the rest soaked through the paper and left a puddle underneath. All of his paintings I set on paper towels, and after ten minutes or so, removed the towels - they were pretty well soaked. It helped to get some of the puddles off the paintings, though.
A note regarding the droppers/paintbrushes/etc.
I've seen different people recommend different things. We tried them all - paintbrushes, Q-tips, eyedroppers, and a medicine syringe.
We had NO luck with the paintbrushes and Q-tips.
The best seemed to be the glass eyedropper shown here. With it we had the best control over where the dye went and how much.

That being said, the boy preferred the syringe - it was messy and hard to control the amount that came out, but that was right up his alley. He loved squirting it all over the paper.
So, Did it Work?
Yes. Although our paintings didn't turn out nearly so neat and precise as some of the ones on Pinterest, it worked. It was messy, but the kids really had fun. By the time they quit, they had used up all of the dye in all the containers (I added a container of red later, so they had four altogether), about four of those little cups of salt (probably about 1 cup in all), large quantities of glue, and the table was covered in artwork. Oh, and did I mention it was messy? The floor around the table ended up pretty crunchy from the salt, and we had to sop up puddles from the table several times, but I had a vinyl tablecloth on, and the floor is sweepable, so it cleaned up pretty fast.
Most of, it kept them occupied for a while and they enjoyed it.
It was not, however, an activity I could give them and leave them to it - I had to stay and help the little one the whole time, mostly so he didn't start randomly squirting dye at his sister and everything else in sight, but still...not something you'd want to start if you aren't available to help.
As of a couple hours late, they weren't dry. We'll see what they look like in the morning.


So, it's wet, it's messy, but it really does work!
Go make some salt paintings! You know you want to!!! :-D